 Windows 10 is the next version of Windows Operating System after Windows 8.1 which aims to bring a lot of desktop functionality back to the hands of users using a mouse and keyboard with their Windows PCs. However, it will not suite everyone (at this stage) due to hardware compatibility issues or just a matter of choice. Follow this guide if you want to remove Windows 10 from your dual-boot configuration and switch back to Windows 8.1
Uninstall Windows 10 Entirely from Dual-Boot
I removed Windows 10 from my system just because I decided to switch to Windows 10 entirely and hence upgrade Windows 8.1 to 10 instead of keeping a dual-boot and giving precious hard drive storage to both the OSes. Here’s how I achieved that:
a.) Removing Windows 10 from Boot Sequence
- Boot into Windows 8.1
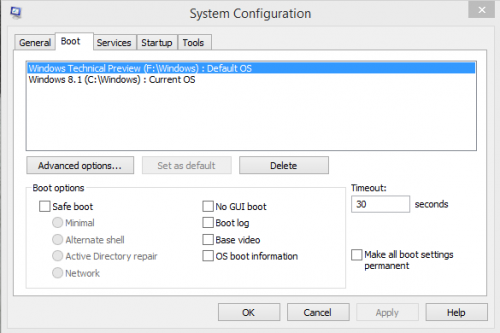
- On the Start Screen, type msconfig.exe and hit enter
- On the Boot tab, highlight Windows Technical Preview or Windows 10

Windows Boot Configuration - Click on Delete
- That’s it. Press OK to close System Configuration window.
b.) Removing Windows 10 Partition and Files
Do backup any important files that you have within your Windows 10 install (Desktop, Documents, Downloads, Other folders within the partition; etc) before proceeding as your data will be permanently lost.
- Open Disk Manager by typing diskmgmt.msc on Start and hitting enter.
- Right click on the drive/partition to which you installed Windows 10. It’s recommended to check the drive letter once again via the Windows Explorer.

Disk Management - Choose Delete volume.
Alternatively, you can also choose to only Format or individually delete the Windows 10 directories via the Windows Explorer. - Create a new partition over the free space that is generated and you’re good to go.


