A redesigned start menu is among the many things that are new in Windows 11. The new layout and design match the look and feel of Windows 11 and provides ample usability improvements. However, very few apps have updated themselves for proper integration in the Windows 11 right-click menu. The result is that a lot of options and app choices are missing from the menu.
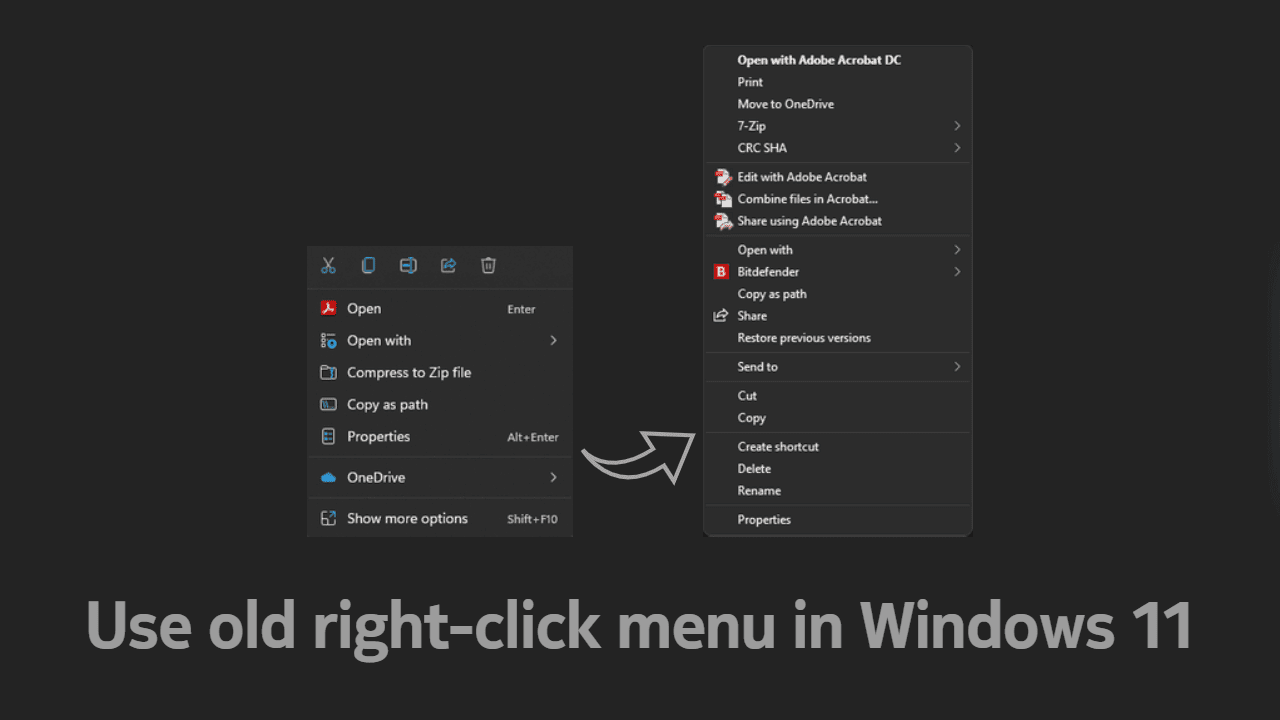
A lot of apps/programs that I use every day have not yet been updated for better integration in Windows 11’s right-click menu. For example, 7-zip the famous open-source file archiver is not accessible from the new right-click context menu. Even Microsoft understands that not all apps will adapt to the new menu, at least not so quickly. Hence, they allowed an easy way to access the old right-click menu.
Contents
Open the old (Windows 10 style) right-click menu temporarily
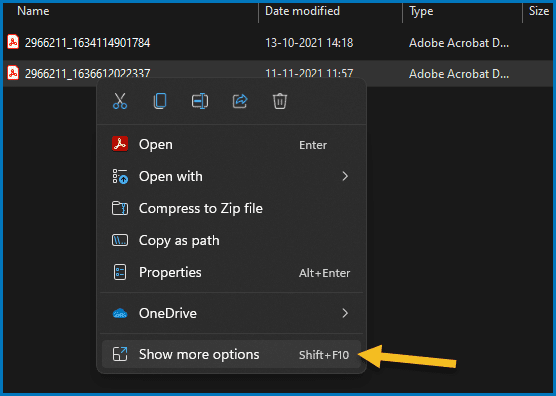
You can temporarily access the old right-click menu by making use of the native option called “show more options” from the right-click menu. You can also press the Ctrl + Shift + F10 keys on your keyboard to directly open the old right-click menu.

This is one extra step, but it is probably okay if you rarely access app options for apps that are not updated for Windows 11. That is if you are happy with the new design of right-click menu in Windows 11 and need to occasionally access the old menu, then it is the best option. You get to enjoy Windows 11’s benefits while still having access to the legacy menu when needed.
Make old right-click menu always open as default (using registry mod)
If you regularly use apps with their options only available via the old right-click menu, then the extra step (as above) will affect your productivity. As such, it is wise to make the old right-click menu the default choice. You can still switch back to the new layout by reverting the changes at any point. Here’s how:
Disable the new right-click menu in Windows 11
- Start Windows Terminal as admin.
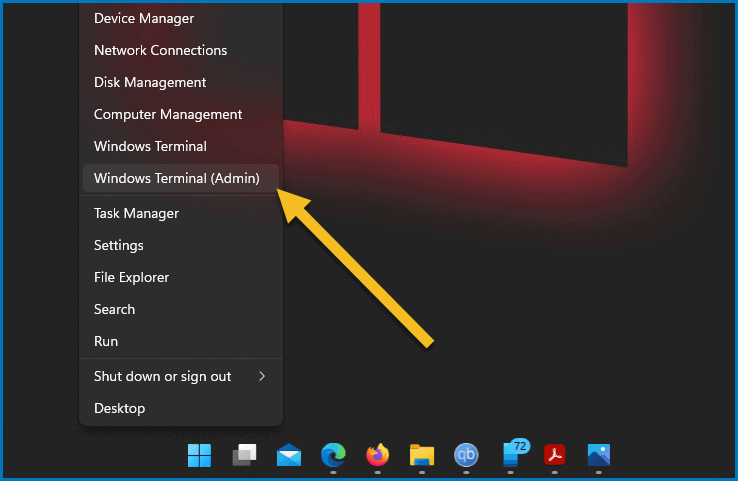
An easy way is to right-click the start button on the taskbar. Then select Windows Terminal (Admin). Then approve the UAC prompt by clicking on Yes.
Alternatively, you can also search for “terminal” in the start menu and then right click to select Run as administrator. - Copy and paste the command below into the terminal window and press Enter on your keyboard.
reg.exe add "HKCU\Software\Classes\CLSID\{86ca1aa0-34aa-4e8b-a509-50c905bae2a2}\InprocServer32" /f /ve
You will get a confirmation of completed command reading “The operation completed successfully.“
- Restart the computer for new registry values to be applied.
That’s it. Any further right-clicks in the Windows explorer and desktop will present you with the old and familiar menu. You won’t need to go through the extra action “show more options” to reach the options of older apps.
Enable the Windows 11 right-click menu
The above steps do not delete the new right-click menu from your Windows 11 PC. The registry value only disables it. You can revert the changes at any point and re-enable the new Windows 11 right-click menu. Simply follow the steps below to delete the registry value created while disabling.
- Start Windows Terminal as admin.
- Copy and paste the command below into the terminal window and press Enter on your keyboard.
reg.exe delete "HKCU\Software\Classes\CLSID\{86ca1aa0-34aa-4e8b-a509-50c905bae2a2}" /f
You will get a confirmation of completed command.
- Restart the PC to enable the new right-click menu.
The Windows 11 right-click menu will once again start showing up whenever you perform a right-click. It is that simple to switch between the two.
What’s your choice? The Windows 11 right-click menu or the old one?
So, which right-click menu do you prefer? Are you happy with Windows 11’s improved take at the right-click menu options? Or are you better with the old layout? Let us know your opinion in the comments section below.


